


- 1 x LC-80
- 1 x LC-066
- 1 x PA-16 (any linear actuator will do)
- 1 x PS-20-12 (any 12V power supply will do)
Now that we have our supplies we'll need to connect everything together. First, let's connect our actuator to our LC-80 MegaMoto Plus shield by attaching the two wire leads from the actuator to the A/B screw terminals on the LC-80. Then we need to connect the LC-80 to our power supply, in this case, a PA-27 control box. We do this by attaching positive and negative wires from the power supply to the LC-80s BAT +/- terminals.
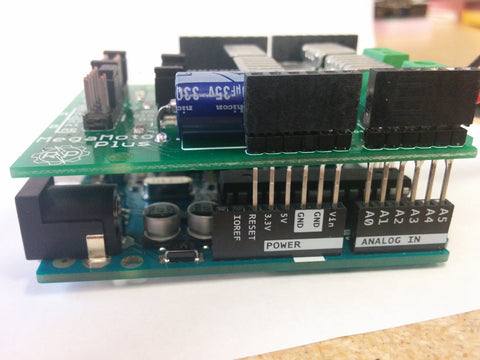
Finally, we need to connect the LC-80 to the LC-066, which is as simple as sticking it on top of one another.
Now in order for us to get actual full control over our actuators motion, we will need to do some programming with our Arduino unit. We've prepared an example code that has our actuator extending, then retracting for 10 seconds each way for a 300-second cycle.
//Use the jumpers on the board to select which pins will be usedOnce programming is complete we need to configure the pins on our LC-80 to match what we entered in the code by setting the jumpers on the LC-80. In this case, we need to set the "Enable" pin to D13, the "PWMA" pin to D11, and the "PWMB" pin to D3. The Enable pin is what controls and powers the motor, without it, the actuator will stop moving and will not be able to be controlled. The PWMA and PWMB pins control the extension and retraction of the actuator. We don't need the "Sensor" pins in this example so don't worry about selecting anything there.
int EnablePin1 = 13;
int PWMPinA1 = 11;
int PWMPinB1 = 3;
int extendtime = 10 * 1000; // 10 seconds, times 1000 to convert to milliseconds
int retracttime = 10 * 1000; // 10 seconds, times 1000 to convert to milliseconds
int timetorun = 300 * 1000; // 300 seconds, times 1000 to convert to milliseconds
int duty;
int elapsedTime;
boolean keepMoving;
void setup() {
Serial.begin(9600);
pinMode(EnablePin1, OUTPUT);//Enable the board
pinMode(PWMPinA1, OUTPUT);
pinMode(PWMPinB1, OUTPUT);//Set motor outputs
elapsedTime = 0; // Set time to 0
keepMoving = true; //The system will move
}//end setup
void loop() {
if (keepMoving)
{
digitalWrite(EnablePin1, HIGH); // enable the motor
pushActuator();
delay(extendtime);
stopActuator();
delay(10);//small delay before retracting
pullActuator();
delay(retracttime);
stopActuator();
elapsedTime = millis();//how long has it been?
if (elapsedTime > timetorun) {//if it's been 300 seconds, stop
Serial.print("Elapsed time is over max run time. Max run time: ");
Serial.println(timetorun);
keepMoving = false;
}
}//end if
}//end main loop
void stopActuator() {
analogWrite(PWMPinA1, 0);
analogWrite(PWMPinB1, 0); // speed 0-255
}
void pushActuator() {
analogWrite(PWMPinA1, 255);
analogWrite(PWMPinB1, 0); // speed 0-255
}
void pullActuator() {
analogWrite(PWMPinA1, 0);
analogWrite(PWMPinB1, 255);//speed 0-255
}
This concludes our example of how to control the timing of a linear actuator's motion. Remember that you can modify the code as you see fit in regards to controlling the actuators speed, it's the extent and retracts time as well as the total amount of time of its motion cycle. Below we have included a video showing this process in action. For the video example, we wanted to show off another way you can alter the timing so we made it extend and retract for 5 seconds at a time over a 20-second cycle instead.
As stated earlier this is just one example of a way you can alter an actuators motion with the help of our microcontrollers. If you have your own custom control method in mind we can have a control system built specifically to your custom requirements with the help of our talented engineer staff. They will guide you through the process and make sure you have full control over your units. If you'd like to learn more about the custom order process take a look at our custom order page.